Uprising! Is the second scenario of Act I: Japan in Age of Empires III: The Asian Dynasties. The scenario is quite short and usually doesn't take more than 25 minutes to complete, although there is a lot to accomplish and strategy involved. It leaves off from the short-lived victory of Osaka and a threat emerging in the Eastern Clans by Uesugi Kagekatsu. The threat must be extinguished quickly or Tokugawa's throne will be overthrown. The scenario involves freeing villages from enemy control and defeat Uesugi's incoming army.
Objectives[]
- Select an ally at your Consulate
- Ride to the nearest town and free its Villagers.
- Destroy as many villages as you can before Uesugi arrives.
- Rebuild all of the Trading Posts along the Trade Route
- Destroy Uesugi's army
Players[]
| This article is a stub. You can help the Wiki by expanding it. |
Player[]
- Eastern Tokugawa Army (Japanese): The player will start out in the Aizu region at the bottom of the map with an army consisting Daimyo Mototada, Kichiro, Naginata Riders, Samurai, and Yumi Archers.
Enemies[]
- Eastern Clan (Japanese)
- Western Clan (Japanese)
- Uesugi Army (Japanese)
Strategy[]

.png)
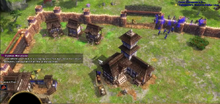
The friendly village provided to the player
The player starts out in the Aizu region at the bottom of the map with an army consisting Daimyo Mototada, Kichiro, Naginata Riders, Samurai, and Yumi Archers. Nearby, a captured village will be found with a reserve of Uesugi's forces viciously guarding it. The enemy forces will consist of the same units the players have but in smaller numbers. The forces will immediately attack the player's army and a bloody battle will occur in which the player's army reaches a high death toll.
Once the forces are defeated, the player can then free the imprisoned villagers in the Stockades. After the Stockades are destroyed and the villagers are freed, they will thank Tokugawa's forces and join the player's side. The player will now have access village in the Commerce Age featuring a Town Center, Consulate, Barracks, and 5 villagers. 4 free shipments will also be provided and using some cards for more Villagers will help increase the economy and create more soldiers.
After the player has complete control of the village, a 10-minute countdown clock will appear on the top of the screen signalling when Uesugi's forces will arrive and the player will have to try to destroy as many villages as they can so Uesugi cannot recruit them as forces. The fewer villages, the smaller the enemy force will be. The player can now begin to attack the nearest village.
The next tiny village will be much smaller than the first village and will only house a Shrine. Villagers will be imprisoned in stockades and guarded by a smaller band of enemy forces. The band will consist of a few Ashigaru Musketeers and Yumi Archers which will be taken out with relative ease by the player. The player can now destroy the Stockades containing 4 villagers. After the Stockades are destroyed, the player can send them to gather resources from gathering food, chopping trees, or mining.

.png)
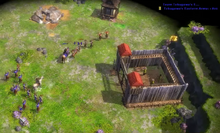
Fighting enemy forces and freeing imprisoned Villagers
With 2 villages taken control of, the player can start to raid the next village in the west. The village will be relatively easy to find by following the trade route running east to west in the southern part of the map. There will be enemy Villagers wandering by themselves near the trading route and killing them will not be necessary as the main objective is to build a force to fight off Uesugi's army.
Once the player reaches the Western Village, they will have to skirmish with the enemy troops stationed there, the troops will be small in size and not a major blow to the Player's army. After the forces are defeated, the player can once again destroy the third Stockades containing 4 Villagers. The Villagers will join the players side and can be put into gathering a resource.
As the player heads North of the Western Village, they will meet refugees who explain how Uesugi destroyed their Trading Posts because they did want to join the rebellion. The refugees will then ask for a request of building Trading Posts along the trade route. If the player has enough wood, it is recommended to build Trading Posts along the trade routes. Not only will it give experience for more shipments, Uesugi's army will attack any Trading Posts in their path, giving the player extra time for building and forming a defense.
Once the Trading Posts are built, the refugees will join the player's sides and will become military units. This will increase the player's army somewhat significantly. A Zen Temple will be found slightly north of the trading route in the west and building a trading post is worth the wood as the Sohei Naginata units will cost no population and are relatively cheap.
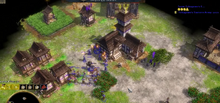
The Player can now attack the first enemy village located in the West. The purple enemy village troops will already receive news of the raids done by Tokugawa's army to the other villages and will charge at the army. They will consist of Yumi Archers and Samurai. Once the troops are defeated, the player can head straight for the village Town Center instead of the nearby Castle as destroying the Town Center will be considered destroying the village. At this point, the player's army will be considerably smaller and reinforcement troops will be needed to defeat the enemy villages.

.png)
With the Western Village destroyed, the player should march their army north to the Northern allied Village. At the same time, they should focus solely on military by receiving military shipments and building an army. Once they have a large enough army, they can send their army to attack the orange Northern Village. The village will not feature a castle but a large army of Ashigarus defending the Town Center. The Ashigaru Musketeer will kill some of the players units but the sole focus would be to destroy the Town Center in that village.
At this point, the player's army should be considerably larger and their resources and population should be pushed to the limit with military units. The countdown will be ticking at the last 2 minutes and the player will have to act very fast. The last and final Allied Village will be the Northeast and will put up the most resistance of all. The player should first send in a large newly formed army of anti cavalry units such as Samurai, Sohei Naginata, and Ashigaru Musketeer to attack the Eastern Village. The village's troops will consist of only of Yabusame and Naginata riders. Once they are taken down, the player send in their major army consisting of Kichiro and Mototada from the Northern Village to attack. The Allied Village will have a castle although destroying it will be unnecessary and time consuming. Imprisoned refugees will be located in the village as well. The imprisoned refugees in the stockades will request the player to destroy the disgraced barracks and the objective should only be followed if the player has time.
Once the Eastern Village is destroyed, the countdown will be ticking at its last seconds and Uesugi's colossul army will appear. The player will have to race back to the southern village and head behind the walls. Additional forces should be stationed behind the friendly village walls. Uesugi's forces will consist a well balanced army of Yabusame, Flaming Arrows, Hatamato Samurai, Yumi Archers, and a couple other units. As the army is about attack, the player should build an army of Sohei Naginata to attack the flaming arrows in the back. Heavy Infantry and Cavalry units will be the first to die as they fight in close combat while Yumi Archers and Kichiro will shoot will a barrage of arrows. The flaming arrows will be the main threat and must be put down quickly. If the player successfully fights off Uesugi's forces and kills off all his army, the scenario is complete.
Exploit: Move Daimyo Mototada to the wall's corner and squeeze other units next to him so that Home Shipment units will spawn outside the wall. Use them to kill enemies, free Villagers from Blockades, build colony, defeat enemies, activate timer, and kill Uesugi's forces.
Gallery[]
")
.png "Uprising! (5).png (553 KB)")
.png "Uprising! (4).png (243 KB)")