The Horns of Hattin is the third scenario of the Saladin campaign in Age of Empires II: The Age of Kings. It depicts the Battle of Hattin.
Scenario Instructions
- Starting age: Feudal Age
- Starting resources: 400 food, 600 wood, 600 gold, 400 stone
- Population limit: 75
- Starting units: Twelve Villagers, fourteen Spearmen, six Skirmishers, one Mangonel, four Cavalry Archers
- Gaia units: None
- Enemies: Jerusalem (Byzantines), British (Britons), Hospitallers (Teutons), Knight Templar (Teutons)
- Allies: None
Objectives
- Capture the Piece of the True Cross (a relic) and return it to the Horns of Hattin (marked by flags)
- Note: There is precious little stone in the desert. You will have to rely of the strength of troops, not castles, walls, or towers.
Official hints
- In this case, the best defense is a good offense.
- There are not very many fish in Lake Tiberas. Support your economy with farms.
- As with any relic, your enemy may garrison the Piece of the True Cross in a Monastery.
- Beware the Templars and Hospitallers - they are your most dangerous opponents.
- Note: There is precious little stone in the desert. You will have to rely of the strength of troops, not castles, walls, or towers.
Strategy
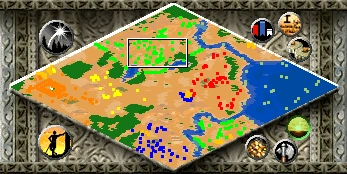
The Saracens attempt to capture a holy relic from the Knights Hospitaller in the desert. You start with two camps, neither of which are especially well-defended. The northern base contains at least one of each major Feudal Age building, nine Villagers, a flock of Sheep, and most of your military units (all except the Cavalry Archers). The southern base has three Villagers, four Cavalry Archers, a Town Center, and one of each military building (Barracks, Archery Range, and Stable). There is gold in the southern base as well as northwest of your main base across some shallows and slightly south. You start with more than enough Houses to support a population of 75, so you won't need to build any more unless your enemies destroy enough of them. Both of your bases are surrounded by Palisade Walls, though these won't keep your enemies out for very long. This scenario is unique in that no players are allowed to build Stone Walls, towers, or Castles even if they buy stone. As a result, there is a much lesser degree of Map Control and there are no Unique Units (save a few Teutonic Knights that the Hospitallers have at the beginning). It is also impossible for any civilization to advance to the Imperial Age.
The map is very crowded, and enemy bases are located very close to your base. Jerusalem (blue) is in the far south, and they'll mainly attack with Spearmen and Men-at-Arms. They cannot advance to the Castle Age. The British (red) are between your two bases, just southeast of the northern base. They start in the Feudal Age, but will advance and send out Crossbowmen as well as Scorpions and Battering Rams. The Knights Templar (yellow), just southwest of your base, start in the Castle Age and attack with Knights, Elite Skirmishers, and Mangonels. The Hospitallers (orange) also start out in the Castle Age and rarely attack, aside from the occasional Knight or Long Swordsman. Their base is in the far west corner of the map.
Starting off and advancing in age
Your first goal should be to advance to the Castle Age, as you'll need Monks to complete the mission and Castle Age units to adequately defend yourself. Immediately after the mission starts, use your Market to sell all but . Your only use for stone is to repair your Town Centers, and repairing them doesn't consume any stone (but you still need at least in your stockpile to do the repair, and they can only be sold in increments of 100). You have enough Villagers, so get four working on each resource. Your north base has food and wood (the trees in the north corner are a good place to build a Lumber Camp ). The major asset in your south base is the gold mine. Get the three Villagers there to begin mining, and send a Villager in your north base to locate and begin gathering from the mine in the northwest.
You also need to prepare for Jerusalem's first attack. An old foe of yours will make a guest appearance, bringing along some Cavaliers. They usually attack your southern base first. Although you can't build a Castle, a Town Center garrisoned with Archers is a feasible alternative. Castles have a longer range and can take more damage, but the attack power of a Town Center is comparable. Create Archers until you have ten in each Town Center, with the accent on your southern base. Also create some Spearmen to counter heavy cavalry in your south camp.
It will be a while before the next heavy attack, so you'll hopefully have time to advance in age. Your starting units can take care of the first few attacks in the north, but it may be wise to research the Man-at-arms upgrade and create a few soldiers in the south if the British can advance to the Castle Age before you do (to counter their Battering Rams). Defense should always be your first priority in this mission, but don't forget to research economic technologies when you can afford them as well.
Defending your bases
You're in a much better position to defend once you reach the Castle Age, as you can create a wider variety of units. Unfortunately, your foes will soon be ready to launch more severe attacks. As soon as you can, build a Siege Workshop in your northern camp. Scorpions are excellent for defense in this mission and you should try to have 3-5 of them close to your Town Center at all times. Unlike Town Centers, their range is long enough to return fire on all ranged units your enemies will use (aside from British Crossbowmen, which Scorpions are still effective against). Furthermore, they have enough attack power to take down light foot-soldiers with ease - even in masses. Finally, Scorpions are much easier to micromanage than cavalry units. This line of defense, along with the garrisoned Town Center, should be enough to protect your Villagers from harassment.
To deal with siege weapons and enemy cavalry, create around five Knights in each base. Camels are effective against cavalry too, though should be used sparingly as they're not very good against anything else. Keep these units back and use them only on units your Scorpions can't handle. Creating enough units to protect your bases should be your top priority, but there are still some defensive technologies worth investing in when you get the chance (Crossbowman, Fletching, Husbandry, Bodkin Arrow, and Masonry - build a University when you can).
Capturing the Piece of the True Cross
Continue defending and gathering, researching military and economic technologies as you can afford them. You'll need to build a Monastery in your northern base so you can create Monks. The gold mine in the south should dry up eventually, in which case you can move all of its units to your main base. When you're ready, build up your forces. Create at least five Monks and a wide variety of other troops (Knights or Light Cavalry, Scorpions, Cavalry Archers, and Camels). You won't need any rams, as the only building you have to knock down is a Palisade Wall.
You need to advance to the Castle Age and create Monks in your North camp. You need to rely on your strength of troops since you cannot build Castles, Walls or Towers in this campaign. You can retrieve the Relic by killing or converting the enemy monks around it. Defeating the Hospitallers is optional. Carry the Relic to the section in between the Flags in your North Camp.
Opponents
- British
- The British are depicted by the Britons and have their camp located just south east from your North Camp. They possess Archers and Siege Units, notably the Scorpion. Due to their reliance on ranged units, mass producing Heavy Cavalry from the Stable will decimate their army.
- Jerusalem
- Jerusalem is depicted by the Byzantines and have their camp just to the west of the player's South Camp. Jerusalem only produce Spearmen and Battering Rams to attack South Camp. These units can be easily countered by Man-at-Arms which are cheap to produce from the Barracks. After around 5 minutes, Reynald de Chatillon appears and attacks your South Camp. This team is probably the first that is good to be attacked due to the fact that the units advisable to attack their camp are cheap and relatively powerful.
- Knights Templar
- The Knights Templar are depicted by the Teutons and have their camp located just south west from the player's initial camp and start in the Castle Age.
- Hospitallers
- The Hospitallers are also depicted by the Teutons and resides near Jerusalem's camp. Monks guard the Piece of the True cross that you must capture to win. They also start in the Castle Age.