| This article is about the scenario in Age of Empires III: The WarChiefs. For the scenario in Age of Empires III, see The Rescue. |
The Rescue is the second scenario of Act I: Fire in Age of Empires III: The WarChiefs. The scenario introduces Colonel Kuechler, a Hessian officer who becomes an enemy of Nathaniel Black throughout the campaign.
Summary[]
The scenario starts out with the cinematic "Kidnapped" and "Kuechler" and revolves around Nathaniel's mother Nonahkee along with other natives being captured and imprisoned by Kuechler's forces. The player will have to defeat Kuechler and enemy Mohawk troops in order to rescue Nohanakee.
Like the previous scenario War Ceremony, the enemy will attack the player if they remain idle in large waves of troops. Unlike the previous scenario however, the player will have a massive war party provided to them, and won't have to worry about a limited army and preventing causality loss. Make note however, the Hessian forces are significantly stronger than the Mohawks, with Doppelsoldners becoming an imminent threat to Kanya Horsemen and Uhlans taking down Aennas and Forest Prowlers with 1-2 hits.
Objectives[]
Primary[]
- Find and destroy one prisoner cage to rescue Native Villagers
- Destroy the prisoner cage holding Nonahkee
Secondary[]
- Build a Trading Post on the Trade Route (200 XP)
Players[]
| This article is a stub. You can help the Wiki by expanding it. |
Player[]
- Oneida Nation (Black Family Estate)
Enemies[]
- Mohawk Tribe (Haudenosaunee) - Will be allied with the Hessians and often will be seen fighting alongside them. Troops will consist mainly of Aennas, Tomahawks, and Kanya Horsemen..
- Hessians (Germans) - Are mainly found guarding Nonahkee and the imprisoned natives, have Haudenosaunee troops mixed in their army. Troops will consist mainly of Uhlans, Doppelsoldners, War Wagons, and Crossbowmen.
Strategy[]
Players start out in the southwest of the map with a friendly village provided, they are provided with a large war party consisting of the Oneida War Chief, Nathaniel, Kayenke, 1 Falconet, 4 Kanya Horsemen, 4 Tomahawks, 7 Forest Prowlers, 2 Mantlets, and 1 Medicine Man. This is more than enough to allow the player to attack the enemy without losing significant causalities early in the game. The player can immediately begin to head east to fight the first Hessian troops. Once the first Hessian brigade is defeated, the player can breach the outer wooden walls of the enemy lines.
- Note: Configuring Villagers to do the War Ceremony on the Community Plaza will help the Player's military throughout the scenario
After the walls are razed, the player can begin a full on assault on the Mohawk troops guarding a Stockades. The enemy Mohawk Aennas and Forest Prowlers will be swiftly defeated allowing the Stockades to be razed. When the Stockades are razed, 4 Villagers will be awarded to the player, helping the player's economy. Make note of however, more imprisoned Villagers will be found later throughout the game. The 4 Villagers should be sent back to the Village where they can hunt Deer or gather Berries for food; allowing large numbers of Aenna needed to keep the war party strong.
The player can then head directly east to attack the second Hessian encampment guarding another Stockade containing 4 Villagers. This encampment will be guarded by more Uhlans and Tomahawks, taking longer to defeat them. The encampment will also located near the shore of a small lake, and an enemy War Canoe will be advantageously attacking the player's troops from a safe distance. The player can use the Mantlets to take down the War Canoe and can proceed to raze the Stockades. Once the Stockades are destroyed, the player can send the 4 newly freed Villagers back to the village there they can chop wood or mine for coin. The player can also optionally choose to build a Trading Post on the Trade Route to compete a secondary objective.
At this point, if any reinforcement Aennas are trained from the War Hut, the player should keep them at the Village to provide defense in case of an enemy Hessian raid. The player can then proceed to advance their war party and follow along the Trade Route, each remaining Stockades will be found near the Trade Route. Each Stockades will be guarded by the same number of troops and the newly freed Villagers should be safely escorted back to the Village with 2-3 Military Units where they can gather resources. As the player heads further north up the winding Trade Route, they will face more powerful military units including Doppelsoldners, that will take down Kanya Horsemen in 2-3 hits with ease. The player should keep their Cavalry in the back whenever clashing with them to prevent unneeded casualties.
At this point if the player has the economy, they can begin naval dominance by building Docks and training Fishing Boats to gather Salmon for Food. There will be enemy presence in the lake however, and training Canoes and War Canoes will be a prerequisite before fishing. Although dominance in the lake is not necessary, it will be beneficiary to player by giving them a foothold on the map and being able to witness incoming enemy armies passing by. The player can also begin to age up to the Fortress Age at this point.
When the last Stockades are destroyed, the player can proceed to move their war party northeast to destroy the Hessian settlement, enemy Uhlans and Doppelsoldners will put up stiff resistance and take down many cavalry and shock infantry in their path, the player should send reinforcements from shipments to compensate for these losses and continue to kill any nearby Settlers and Hessian troops. As they enter further in the settlement, they will reach the cave where Nonahkee and other native captives are kept.
- Note: Destroying all the buildings of the Hessian settlement is not necessary and will not achieve much, the main objective is to free Nonahkee and the captives
Defeating the troops imprisoning Nonahkee may seem a very daunting task and seemingly to no avail, however the player has more than enough troops and will need to use strategy. When the Doppelsoldners begin their charge, the player should place any Cavalry behind front lines and allow the Doppelsoldners to chase them. While this is happening, all ranged units will do a great deal of damage to the Doppelsoldners and weaken them to the point of being easily defeated. Using the hit and run strategy with Musket Riders will also be helpful to defeat the enemy heavy infantry.
Once the remaining enemy troops are defeated, a litter of corpses will lie of both the player's and enemy's troops. The player can then proceed to destroy the Stockade imprisoning Nonahkee and the captives. Once the Stockade is razed, the scenario is complete.
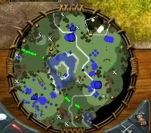
The map[]
Mini map
The map will feature a layout very similar to Great Lakes in that there will be a central round shaped lake in the center of the map with a circular Trade Route running across the map. The lake has pristine blue waters will be significantly smaller although it will have a small island in the center where a treasure will lie. Deer can be found foraging near the lake alongside Berry Bushes and provide a steady source of Food. Silver Mines will be found near the forests of the map at irregular intervals providing Coin. The trees will be once again in vibrant reds, yellows, and oranges like the previous scenario War Ceremony. Salmon will be found thriving in the central lake where they will provide a bounty of Fishing Boats can gather them for Food.
Trivia[]
- This is the last time the player can train the Forest Prowlers in Act I.
- This is the only campaign scenario in the entire series which uses a previously used title.
Gallery[]
")
")
")
")
")
")
")
")
")
")