Bring Down the Mountain is the eighth and final scenario of Act II: Ice in Age of Empires III. Ká:nien must stall the Russian Army while Warwick and John Black fight atop the mountain. The objective is to "build" explosives on six points with Miners while preventing the artillery in the Russian convoys from proceeding.
Objectives[]
Primary objectives[]
- Use your miners to collapse the Rock Bridges.
- (Unlisted, but shown at the corner of the screen and will instantly end the scenario) Don't let "Russian Cannon escaped" reach 10.
Secondary objectives[]
- Destroy a Great Cannon. (Unlisted reward of 160 XP)
Players[]
- Kanyenke (John Black's Mercenaries) - The player in this level starts with two Town Centers, one in the north and one in the east, with two Culverins, two Barracks, one Stable and one Market. Some Settlers will already be collecting resources, and the player will start with over 500 of each resource.
Allies[]
- John Black (John Black's Mercenaries) - John Black will tell Ká:nien to close the three passages and get the Russians to pass by an alternate northern passage. He will give the player some Miners to help achieve this. John Black will run off the north of the map.
- Miners (Ottomans) - John Black will send some Miners. They may appear to flash yellow or brown in the north of the map near the Town Center before they convert to the player's control.
Enemies[]
- Russian Guard (Russians) - The Russian Guard have buildings in the southwest of the map, which will produce Cossacks to protect the Streltsy, and have Settlers collecting resources.
- Russian Artillery (Russians) - A Russian convoy will always appear at the southwest end of the map from the Russian Guard buildings, with a Great Cannon and several Streltsy to protect the cannon. They will try to cross the map. The player will always have vision over Russian Artillery units.
Strategy[]
Map Analysis[]

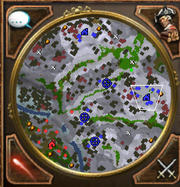
The level minimap revealed
It appears confusing and convoluted, especially if units and herdables are imposed on the minimap. It can however be broken down into four passes separating several islands of higher ground:
- The northernmost (first) island contains the main Town Center, along with a Market, the miner's cave (with crates of gold spawning here at certain times), numerous herdables and silver mines, and two ramps. Russian units will periodically raid here, so the eastern ramp can mostly be blocked off with Houses and an Outpost to make things much easier (and prevent their Villagers stealing food!).
- The second northern island has a single ramp (at its eastern point). This is hidden at the start of the scenario. It can be important later on to defend this island because the pass north of it can never be blocked, and if the Artillery choose this route they will be out of range of the fourth island. On the other hand, this is very rare and a few cannons are allowed to escape. It has a single Rock Bridge explosives site on its southern side, however.
- The middle island (third from top) contains the secondary Town Center and comes with two Barracks and a Stable. This is what will be shown at the start of the match. It has some herdables, but fewer than the first island. It isn't really worth putting defenders on this island, as it isn't as long as the second or fourth islands. However, two of the explosive Rock Bridge sites are on the west of the island.
- The fourth island (second southernmost) has two ramps to its north and one to its south. Sometimes the convoys will cross passes here in order to reach the exit on the east side of the map instead. It is the most important island to defend while placing explosives, as it can cover the three passes furthest from the player's bases. Until the lowermost passage is collapsed, make sure to leave some defenses on the south side, or the Russians can slip past by walking at the far point of the ford. It also has two more explosive sites to collapse the Rock Bridges.
- The fifth island has two ramps very close together and the final Rock Bridge explosives point.
Russian convoys (including Streltsy, and rarely this faction will get a Falconet) will spawn from the gold mine in their base and continue until Rock Bridges are all collapsed, even if the Guard faction's base is destroyed. If possible, razing the guard base will make it much easier, because the spawn point can then be camped by melee cavalry. If the southern passes are collapsed, they will turn at the Market and head for the next available pass out of the three.
Tips/Walkthrough[]
- Build lots of Villagers, and send them to hunt. Collect the coin in the north cave (the miners can do this also).
- Hotkey the miners so they don't go missing. Send them to clear the passes (it is probably most convenient to start with the fourth island and the fifth, before working northwards). They will build slowly at first, but more miners will spawn later. Miners can also be used to gather sources of coin. Don't worry too much about losing them; more will respawn if they die until there are 10 on the map. If they are separated, the "find all of selected type" hotkey may be useful.
- Build some artillery using the coin. Falconets are excellent for the Streltsy, but some Culverins will help destroy the Russian Great Cannons. Priests or the Surgeon card (assuming you already sent 600 coin anyway) can be very helpful keeping these alive.
- Uhlans are very useful against the convoys and are very mobile. As long as the convoys are dealt with, for the Guard cheaper Musketeers (to reduce the coin strain) may be more efficient. Don't forget to send Home City Cards!
- First, focus on defending the bases against the Guard's attack waves. Then defend and seal the far southernmost pass with the Culverin on the fourth island; a few can get through on the upper passes in the north. This will prevent the army from being split up.
- Apart from unit spawns, no other special events happen, even if convoys get past (there will be a reminder at 5 escaped artillery though). Note that sometimes two convoys will spawn at once.
Aftermath[]
A cinematic will play that explains what happened at the top of the mountain. Amelia will also explain its consequences on the Black Family history, as well as the story of how the family line continued. Congratulations, Act II complete!
Trivia[]
- Russian troops in North America is not historically wrong, since they began to colonize Alaska in 1733 (however, the incorporation of Alaska into the Russian Empire would only be formalized in 1799, several decades after this campaign).
- This is the only scenario in Act II in which John Black is not controllable by the player.
Gallery[]
")
")
")