| “ | In the late sixteenth century, the Knights of St. John defended their last stronghold on the Mediterranean island of Malta from an Ottoman invasion. | ” |
| —Mission Description | ||
Breakout is the first scenario of Act I: Blood in Age of Empires III. In the scenario, the knight Morgan Black must defend a fort on Malta from the Ottoman Empire.
Summary
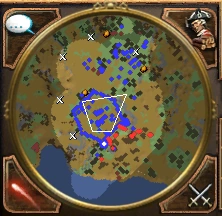
Breakout mini map
The scenario starts with a cutscene, with Amelia Black detailing how her family got to the Americas, starting off with her ancestor Morgan Black and the Knights of St. John dealing with the invading Ottomans led by Sahin The Falcon, who mocks Morgan and the Knights because of their outdated technology, and states that the "Crusades are over".
The scenario game-play starts with the player's fort being attacked by a group of Janissaries, where Morgan Black, several Pikemen and Crossbowmen , a Barracks, several Houses , fort walls, 4 Outposts, along with a Market, a Mill, an Outpost, and several Settlers in the northeast are helping to defend the fort.
You do not have access to your Home City in this scenario and cannot send shipments, and you can't choose new Home City Cards either once the scenario is complete. Despite this, you can level up your Home City, and experience earned will be saved for later.
Objectives
Primary objectives
- Defend the Fort Command Post.
- Use Settlers to gather the wood on the hill to light the signal fire.
- Destroy all the Great Bombards.
Secondary objectives
- Collect all the treasures on the map. (300 XP)
Players
- Morgan Black (Knights of St. John) - The player starts with Morgan in the Fortress Age, along with 15-18 Crossbowmen, a walled Fort, two Outposts and 8 Pikemen, Settlers, a Market, Houses, and several Barracks, but no Town Center.
- Regardless of difficulty the knights' start with a combined stockpile of 1300 food, 1900 wood, 500 coin, available in either crates or already stockpiled. Along with all the Mill upgrades and Woodcutting upgrades at the Market.
- On Easy, the knights start with 18 Crossbowmen, while all your Pikemen, Rodeleros and Crossbowmen start already at veteran. In addition, you have only 2 piles of wood to collect in order to start the signal fire. The knights start with 21 Settlers, with the Blunderbuss and Great Coat upgrade.
- On Moderate, the knights also start with 18 Crossbowmen and 8 Pikemen but without any upgrades for them. The knights have the standard amount of 4 piles of wood to start the signal fire. The knights also only start with 19 Settlers.
- On Hard, the knights only start with 15 Crossbowmen. The knights also only start with 17 Settlers.
- Regardless of difficulty the knights' start with a combined stockpile of 1300 food, 1900 wood, 500 coin, available in either crates or already stockpiled. Along with all the Mill upgrades and Woodcutting upgrades at the Market.
Allies
- Alain Magnan (Knights of St. John) - Only appears after the signal fire has been activated, and consists of an army of 16-18 Hussars and Alain himself, to defeat the Ottoman Bombards. These units will be converted to the Knights of Saint John when they arrive in the fort.
Enemies
- Ottomans (British) - Attacks the player periodically with Janissaries, Spahi, and also uses a Galley when Settlers are lighting the signal fire to transport a few Janissaries to attack them. They have no base and regularly spawn from the southwest. Eventually, they arrive with 5 Great Bombards.
- The have fewer units on Easy.
Treasures
There are 5 treasures scattered around, all visible from the start, and none of them are guarded.
- A supply of limestone worth 150 coin
- Grove of oak trees worth 150 wood
- Some oak trees worth 75 wood
- A Chinquapin oak tree acorns edibles worth 150 food
- A carob plant worth 75 food
Strategy
In Breakout, you are tasked with defending your base from an invading Ottoman army. You have a decent supply of resources and Settlers for this scenario, and don't have a Town Center anyway, so focus on training Crossbowmen to defeat the attacking Janissaries.
Retask your one coin miner and all your Settlers on the Mill along with a few lumberjacks onto the Deer nearby, as you won't need any gold other than that you start with and you will need food more than wood (you start with more wood and get 1,000-2,000 wood from the piles surrounding the signal fire).
You should train Crossbowmen in your Barracks while you can upgrade your Crossbowmen in the rear Barracks northeast of the fort.
While your soldiers are fighting, locate Morgan Black and send him to collect the 5 treasures (marked by an 'X'). Collecting all of the treasures will give you bonus experience and resources which could be helpful. After Morgan Black is done treasure hunting, return him back to the base to help with the defense. Remember to use his Oberhau ability, as it will deal a lot of damage to all the enemies near him.
Eventually you will hear Morgan Black request to use the Pikemen to combat the Ottoman cavalry. Pikemen are actually not very good in this scenario, as they are easily killed by the Janissaries and cost as much as Crossbowmen. The few Spahi that do attack are weakened for this scenario and are easily killed at range, getting very few attacks on your Crossbowmen.
Your Crossbowmen will eventually be overwhelmed when the Ottomans bring their Great Bombards, so Morgan Black will call for reinforcements, and a signal will appear in the upper-left corner of the map, atop a hill. At this point, you can send every Settler as any Crossbowmen that are trained are immediately killed, so you won't need any more resources. When the Ottomans see this, they will send a small group of troops to kill the Settlers, but if you sent everyone, they will light the fire and can get away safely before the Janissaries reach them.
It will actually take quite a while for the Ottomans to destroy your fort command building, more than enough time for Alain to arrive and destroy the bombards.
After the signal flare is lit, the Settlers can return to their every day duties and after a short period of time, a large group of friendly Hussars will come from the top of the map led by commander of the Knights of St. John, Alain Magnan. When the cavalry enter your fort ,they are in your control, so order the Hussars to destroy all of the Great Bombards and after they are crushed you will win the scenario (Your Hussars can kill the enemy Bombards even with the anti-cavalry Janissaries around with no difficulty).
Notes
- This scenario can be beaten using only Crossbowmen. Take the Crossbowmen upgrade at the Barracks immediately and train as many Crossbowmen as possible. Send Morgan Black off gathering treasures using shift and right click to setup gather waypoints for all of them. Drag select small groups (8-9) of Crossbowmen and have them target separate Janissaries while hiding behind the fort walls. Push out when and if at all possible (easy, normal) to take pressure off the walls/gate and repair them. Move the Crossbowmen to the left or the right of the gates, otherwise Bombards will obliterate them as they primarily target the gate (splash damage kills the archers).
- You will lose the gates, and possibly some buildings on normal and hard but as long as you've sent at least 8 Settlers to light the signal fire you can get it burning before the Ottomans arrive to stop you (have Morgan present to protect them from the Ottoman cavalry on hard and start retreating your Crossbowmen to here also to handle the other units) and Alain will arrive before your Command Post has been destroyed (even though most of your units are dead or wounded and the fort has been breached). Also, after Alain enters the map, the Ottoman waves stop coming, leaving your enemy with no reinforcements and their AI focusing more on the two large guard towers and the wall fragments still standing.
- You have several Outposts and Fort Tower for defense. Repairing those whenever possible will allow them to do more damage as well as stall the enemy advance. Repair your walls to hold out even longer.
- While the Settlers are initially tasked on the Mill, there are huntable Deer located nearby which will allow them to gather food faster. Use the Market to research Hunting Dogs and Steel Traps to further increase gathering speed.
Trivia
- Although not explicitly stated, this opening is based on the Great Siege of Malta in 1565, setting the start of Act I in 1565, although Alain and Morgan Black are otherwise fictional.
- In the southeast of the map, there are three infinite spawn points for Ottoman Janissaries and Spahis near two plateaus.
- Sahin's army during the first level of the campaign appear as belonging to the British civilization instead of the Ottoman civilization (note the flag of the Ottoman Galley), despite the Ottoman civilization being in the game since its launch.
- If you never send the settlers collecting wood around the torch to light it, Alain Magnan's cavalry will never come and the scenario will never end; even killing the Great Bombards with Crossbowmen, Rodeleros and Pikemen will not end it.